Editor’s note: This is a hands-on playbook for moving money from the US to Singapore accounts. It explains cost components, how to run a pilot, and how to avoid avoidable delays. Educational only.

What “all-in cost” really means
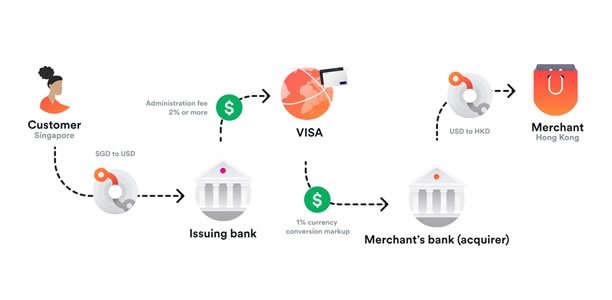
All-in cost = Sending fee (US bank or provider) + Intermediary deductions (if any) + Receiving fee (SG bank) + FX spread × amount. People often compare only the headline send fee. You need the spreadsheet view: every line item, the timestamp of each hop, and what landed in SGD.
Step 1 — Map your candidates
• US bank domestic wire → international wire (SWIFT) to SG bank.
• Licensed money transfer providers that convert USD→SGD.
• A multi-currency account that lets you hold USD and convert later.
Create a simple table with columns: Route name, Send fee, FX spread vs mid, Intermediary fee, Receive fee, Typical time to credit, Error/recall policy, Daily/monthly caps.
Step 2 — Run a US$1–US$10 pilot on each route
• Keep amount and time-of-day similar for fairness.
• Record the mid-market rate at send time and the actual applied rate.
• Note timestamps: when money left the US institution; when it arrived; when it became spendable.
• Keep all reference numbers and payment IDs.
Step 3 — Interpret results like an ops person
• If a route is cheap but routinely lands next day, it may still be fine for rent or tuition, but not for urgent payroll.
• If deductions appear at random (intermediary fees), ask your bank for the correspondent path; try an alternate route that avoids that correspondent.
• If the FX spread widens on weekends or after US hours, schedule transfers to avoid those windows.

Reducing friction before you hit “send”
• Beneficiary details must match exactly, including second given names and address fields.
• Use the recommended payment purpose codes where the form allows it; vague descriptions can trigger manual review.
• Notify your SG bank if you plan an unusually large inbound transfer, especially if you just opened the account.
Choosing between bank-to-bank and providers
• Bank-to-bank is convenient when you already run US wires and like having everything in one place; visibility and recall options can be clearer.
• Licensed providers can be significantly cheaper on FX and fast in practice, but caps and onboarding steps vary. Do not assume a provider supports your exact corridor or beneficiary type until you test.
Handling USD balances and conversion timing
• If you can hold USD and convert later, you control the timing of FX—but watch custody and fees.
• For recurring needs (rent, school fees), consider scheduled conversions to average rates and reduce decision stress.
What to do when things go wrong
• If funds are missing after the typical window, contact both sides with the reference numbers; ask for an MT103 or equivalent trace.
• For mistaken details, call immediately—recalls are possible but not guaranteed.
• Keep a running log; future transfers get easier when you know how your counterparties behave.
A starter template (copy this into your sheet)
Columns: Date, Route name, Amount USD, Mid-market rate, Applied rate, Send fee, Intermediary fee, Receive fee, Implied FX spread (bps), SGD received, Send time, Credit time, Spendable time, Notes.
Target: Choose the route with the lowest predictable all-in cost that still meets your reliability window.
Security reminders that save real money
• Never change beneficiary details based on email alone; verify by phone using a known number.
• Use small pilots for new beneficiaries; whitelist only after two clean successes.
• Lock your account and cards if you suspect social engineering; call through the official app.
Bottom line
Don’t pick on slogans. Pick on data. Two or three pilots will tell you which route is both cheap and reliable for your pattern. Keep the spreadsheet live; update it quarterly.
Five optional implementation tips (pick what you like)
- Turn the “USD→SGD template” into a downloadable CSV/PDF gated by email on your Resources page to raise RPM and leads.
- Add a small “Data last verified • YYYY-MM-DD” line under each article title, and a three-item change log at the bottom to boost E-E-A-T.
- Cross-link each piece to your “Compare Top Banks” hub and your “Anti-Scam Banking Guide”; add two contextual internal links per article.
- Create a one-page “US Person Onboarding Checklist” PDF (W-9/FATCA/CRS, SoW/SoF, address proofs, pilot-transfer steps) and feature it in the right rail.
- For analytics, build a GA4 segment for “Country = United States” and track how often these articles push users into Bank Hubs and Compare pages; adjust CTAs and in-text links based on that flow.
Related FAQs
-
Avoid Mistakes When Choosing a Bank in Singapore’s Stable Financial System
FAQ article on bankopensingapore.com
Read full answer → -
personal banking: What You Need to Know in 2024
FAQ article on bankopensingapore.com
Read full answer → -
RHB Singapore Overview Services and Account Opening Guide
RHB is a Malaysia based banking group with Singapore operations serving retail customers, SMEs, and corporates. Detailed Introduction: Individuals can access savings/current accounts, cards, personal financing, and invest
Read full answer →


